Discussions on how to start your own business, find out what you should be, and more will be starting soon.

Author Archive for What Should I Be
During an interview, we typically connect to you (the Interviewee) using Skype. But regardless of whether it’s Skype or any other video conferencing service, the use of a webcam (to capture your video and audio) is typically what we expect most people to be using. Webcams are common in most laptops, and are affordable add-ons for most computers.
NOTE: The use of Skype, over a mobile device or tablet, using a built in camera, within the device, will not provide a clear enough video and therefore cannot be permitted. Please use Skype from a computer (PC, MAC or Linux).
It’s important when using Skype, to TURN OFF all of the automatic functionality of the webcam. The term “automatic functionality” refers to things such as “audo light”, “auto sound”, “auto exposure”, etc.
See example instructions below that have been provided via screen shots for a common webcam (Logitech QuickCam Pro 9000). This is just one example and your individual webcam may be different. We hope that this information and the screen shots will help provide you with the necessary information of where to go and what to access (in your webcam control panel) so you can make the adjustments needed to help insure that your interview comes through as clear as possible.
STEP 1:
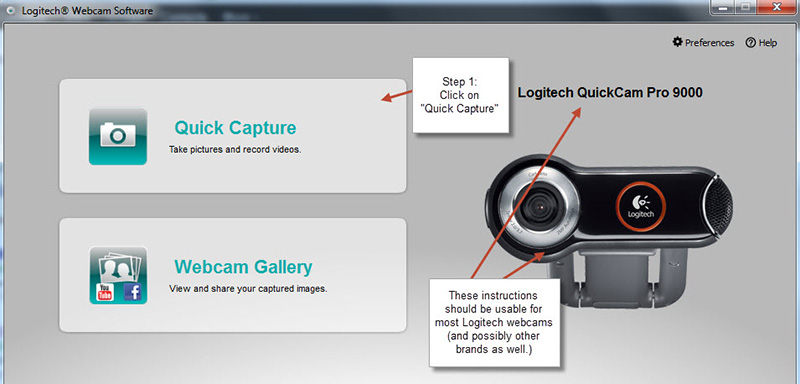
Step 1: Click on “Quick Capture”
Then, .. these instructions should be usable for most Logitch webcams (and possibly other brands as well.)
STEP 2:
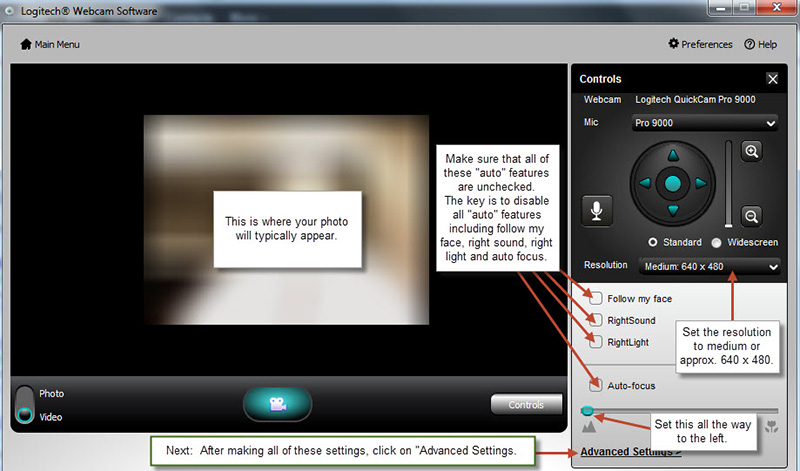
You’ll notice that there’s a blurry area in the middle. This is where your photo will typically appear in your webcam’s control panel.
Next, make sure that all of the “auto” features are unchecked (which means they are OFF). The key (to sending a good video signal) is to disable all “auto” features including “follow my face”, “right sound”, “right light”, and “auto focus”.
Be sure to also set the resolution to “medium” or approximately 640 x480. Do not select a “high” resolution as it will slow down the delivery of your video.
The last item (noted in the above screenshot) says “set this all the way to the left.” This is for the focus. They sliding this all the way to the left, most everything in the webcam will be in focus. (Both things close, medium distance and far.) So, be sure to slide this all the way to the left to insure you will be in focus.
Lastly, for this section, click on “Advanced Settings” to make the final adjustments.
STEP 3:
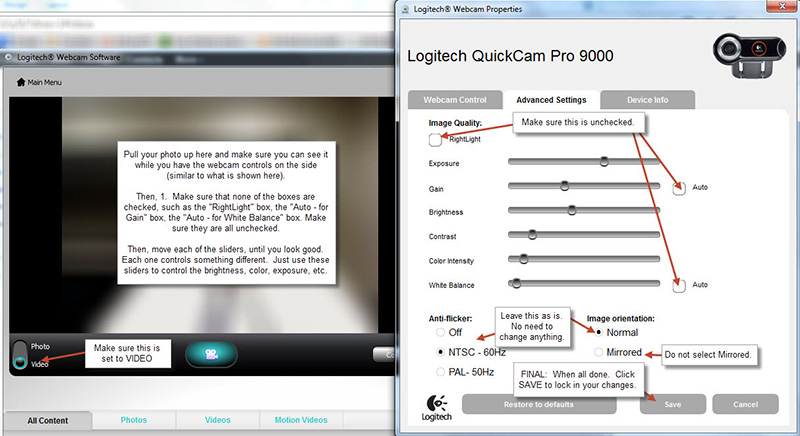
These are the final adjustments needed. Again, you’ll see the blurry area where your video stream will appear.
Be sure, now that you have should have two possible windows that are open (one with the video stream and one with the advanced controls), to pull slide the window with your video stream to the side (so you can still see it) but also so you can see the controls off to the side.
1. Make sure that you are looking at your video stream and not photo (as indicated in the lower left of the above screen shot.)
2. Again, make sure that all of the items indicated (in the above screen shot) are unchecked, such as anything “auto.” For example, make sure that auto white balance is not checked, image quality right light should not be checked, auto gain should not be checked.
Then with everything unchecked .. now you can begin moving the sliders around to get your video stream to look as good as possible. For example, use the exposure, gain, brightness, etc. sliders .. (all of them) .. to get your video to look as clear and as good as possible.
Leave the anti-flicker and image orientation alone. There is typically no reason to make any changes. Just make sure that “mirrored” is not selected. (Mirrored means – the reverse your video stream. Think of this as looking in a mirror, how it can look odd since your face is actually reversed. So you don’t want to select mirrored.)
And finally, click on SAVE to lock in your changes.
If you feel you need additional help, please contact us. We’ll be happy to try to assist you in any way we can.